
How to Use Chameleon Paints for Special Effects
Table of Contents
- Why Chameleon Paints Create Effects Regular Metallics Can't
- Surface Preparation and the Best Primer for Color Shift Paint
- How to Thin Chameleon Paint for Airbrushing
- Brush vs. Airbrush: Picking Your Application Method
- Layering, Coats, and Curing for a Stronger Color Shift
- Substrate Guide: 3D Prints, Resin, Metal, and Plastic
- Sealing Chameleon Paint on Miniatures
- Troubleshooting Common Application Errors
- Frequently Asked Questions
Last Updated: September 25, 2026
Why Chameleon Paints Create Effects Regular Metallics Can't
Chameleon paints are color-shifting acrylics that change hue as light and viewing angle move, creating effects regular metallics simply cannot match. This guide from Pewgilist walks through how to use chameleon paints for special effects on miniatures, models, and 3D prints.

Surface Preparation and the Best Primer for Color Shift Paint
The best primer for color shift paint is a smooth, glossy black base. Surface prep decides whether your chameleon paints look dramatic or dull.

Degreasing, Sanding, and Print Cleanup
Work through these steps before any primer touches the model:
- Wash resin prints in warm soapy water to remove uncured residue
- Degrease metal and plastic parts with isopropyl alcohol
- Sand rough spots with 800 to 1000 grit paper
- Fill print layer lines with a thin filler primer
- Re-sand the filler flat once dry
- Wipe the whole surface down again before priming
Why Gloss Black Beats Matt Black Under a Color Shift
Gloss black gives chameleon pigment a mirror-smooth surface to refract against. Matt black scatters light in every direction, which flattens the shift.
How to Thin Chameleon Paint for Airbrushing
Thinning chameleon paint for airbrushing means matching viscosity to your needle size, usually around 1:1 paint to thinner for a 0.3mm nozzle. Too thick and it spatters. Too thin and the pigment separates.
Mixing Ratios and Viscosity Checks
A practical starting point for most airbrush work:
| Needle Size | Paint to Thinner | Typical Use |
|---|---|---|
| 0.2mm | 1:1.5 | Fine detail and small panels |
| 0.3mm | 1:1 | General coverage |
| 0.5mm | 2:1 | Large vehicles and terrain |
Test viscosity by pulling a stir stick out of the mix. The paint should run off in a thin, steady stream, not drip in blobs. If it looks like skim milk, it's close.
Brush vs. Airbrush: Picking Your Application Method
Airbrush wins for even color shift across large, flat surfaces. Brush work wins for small details, tight corners, and control.
Here's the honest breakdown:
- Airbrush: Even coats, fast coverage, best for vehicles and armor panels. Needs thinning and cleanup time.
- Brush: No setup, great for touch-ups and fine trim. Risks visible brush strokes that break the shift.
- Spray bomb: Fast for terrain and large prints, but harder to control coat thickness.
Layering, Coats, and Curing for a Stronger Color Shift
Two to three thin coats beat one heavy coat every time. Heavy coats pool, and pooled pigment kills the angle-dependent shift.
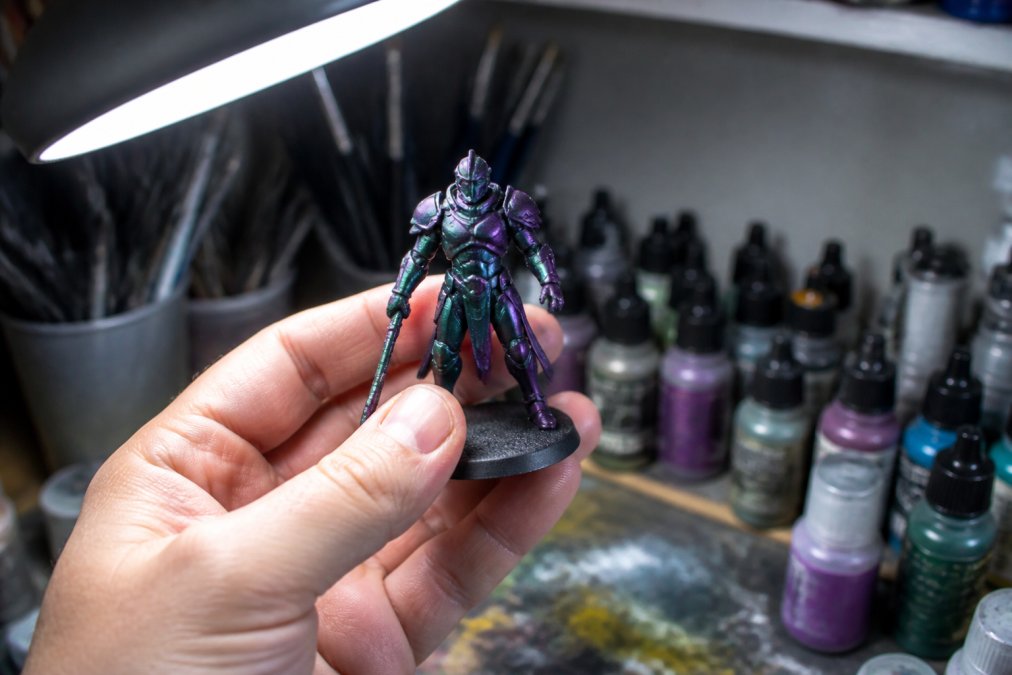
Substrate Guide: 3D Prints, Resin, Metal, and Plastic
Chameleon pigment is semi-transparent, so every flaw in the layer beneath it becomes part of the final effect. Each substrate fails in a different way, and each needs a different prep routine before the gloss black base goes down.
FDM 3D Prints
Layer lines are the enemy here. Under a gloss black base and a color-shift topcoat, a 0.2mm layer line reads as a visible ridge that catches light at the wrong angle and breaks the shift into stripes.
A workable sequence:
- Sand with 220 grit to knock down the tallest ridges, then step to 400, then 800. Skipping grits leaves scratches that primer will not hide.
- Apply a filler primer in two thin coats rather than one wet coat. A heavy filler coat shrinks as it dries and re-exposes the lines.
- Re-sand the filler with 800 to 1000 grit once fully dry, usually overnight, not the one hour on the can.
- Wipe with isopropyl alcohol before the gloss black.
Resin Prints
Uncured resin is the single most common cause of fisheye and crawling under chameleon paint. The mechanism is straightforward: residual monomer on the surface repels the acrylic binder, and the pigment flakes pool away from those spots.
- Wash the print in two stages, a dirty bath first, then a clean isopropyl alcohol bath. A single bath just redistributes resin.
- Cure fully under UV before any paint touches the surface. A print that feels dry to the touch can still be tacky underneath.
- Scuff lightly with 1000 grit to give the primer a mechanical key. Resin surfaces are smooth enough that primer can flake off in sheets without it.
- Prime with a filler primer if layer lines are visible, then gloss black.
Metal
Metal needs a chemical key, not just a mechanical one. Acrylic primer does not bond well to bare metal, and chameleon layers on top will chip at the edges.
- Degrease with isopropyl alcohol or a dedicated wax and grease remover. Metal parts often carry machining oil that soap and water will not lift.
- Apply a self-etching primer as the first layer. This is the step most painters skip, and it is the one that determines whether the finish survives handling.
- Follow with the gloss black base once the etch primer has cured per its instructions.
Plastic
Injection-molded plastic parts frequently carry mold release agent, which acts like a contaminant on the surface. Primer will bead on it, and the beading texture never fully disappears under a gloss topcoat.
- Wash the part in warm water with a drop of dish soap, then rinse and dry.
- Wipe with isopropyl alcohol to remove any remaining release agent.
- Scuff with 800 grit to give the acrylic something to bite.
- Prime, then gloss black.
Choosing the Right Primer for Each Substrate
A common pattern among painters working across materials is to keep two primers on hand: a filler primer for anything with surface texture (FDM prints, rough resin), and a self-etching primer for metal. Gloss black base coat goes over whichever primer the substrate called for, never directly onto bare metal or bare plastic.
Sealing Chameleon Paint on Miniatures
Sealing is where most chameleon paint jobs are either locked in or ruined. The pigment flakes need a smooth, clear layer above them to refract light at the right angle. The wrong topcoat either clouds that layer or chemically attacks the acrylic beneath it.
Why Gloss Preserves the Shift and Matte Kills It
Gloss varnish dries to a level, continuous film. Light passes through it, hits the pigment flake, and refracts at the angle-dependent wavelength that produces the shift.
- Apply a gloss varnish coat and let it cure fully. This locks in the refraction.
- Apply a light matte coat on top. This softens the surface sheen without touching the pigment layer.
Clear Coat Compatibility: What Works and What Ruins the Finish
The chemistry matters more than the brand. Chameleon paints are water-based acrylics, and the topcoat has to be compatible with that base.
Safe pairings:
- Water-based acrylic varnish over water-based acrylic chameleon paint. This is the default safe choice.
- Water-based polyurethane varnish over fully cured acrylic. Durable and clear, but confirm it is water-based, not oil-modified.
- Acrylic gloss medium thinned for airbrush, used as a sealing coat. Less durable than varnish but fully compatible.
Risky pairings:
- Solvent-based lacquer or enamel clear coats over acrylic chameleon paint. The solvent can attack the acrylic binder, causing wrinkling, clouding, or a crazed surface. If you must use a solvent clear, apply it in extremely thin mist coats and test on a spare piece first.
- Oil-modified polyurethane. The oil component can yellow over time and reacts unpredictably with acrylic layers.
- Any clear coat applied over chameleon paint that has not fully cured. Trapped solvent under the clear coat turns the finish cloudy and the cloudiness is permanent.
Cure Time Before Sealing
Acrylic chameleon paint feels dry to the touch in minutes but continues to harden for hours. A common pattern is to wait a full 24 hours after the last chameleon coat before sealing. Sealing over a tacky layer traps solvent and wrinkles the shift.
Testing Before You Commit
Spray or brush a small amount of your intended clear coat onto a spare piece painted with the same chameleon layers. Let it cure fully, not just dry, and check for clouding, wrinkling, or dulling. This takes a day and saves a finished model.
Troubleshooting Common Application Errors
Most chameleon paint problems trace back to prep, thinning, or timing. Here's how to fix the usual suspects.
| Problem | Likely Cause | Fix |
|---|---|---|
| Weak color shift | Matte or light base coat | Reprime in gloss black |
| Cloudy finish | Trapped solvent | Let layers cure longer |
| Spattering | Paint too thick | Thin in small steps |
| Blotchy coverage | Heavy single coat | Switch to thin layers |
| Dull iridescence | Matte sealer | Use gloss varnish first |
Frequently Asked Questions
Does chameleon paint require special prep?
It needs a smoother, glossier surface than most acrylics. Wash the model to remove mold release or fingerprint oils, sand away print layer lines, and prime it. Then apply a gloss black base coat, because the color shift depends on light bouncing back through the pigment layer. A matt or uneven base scatters that light and flattens the effect. Primer and base coat together do most of the work before the chameleon paint ever touches the model.
How do you apply chameleon paint for the best color-shift effect?
Airbrushing gives the most even coat, which matters because thin, uneven layers break up the shift. If you're brushing, load lightly and use long, single-direction strokes instead of scrubbing back and forth. Build two or three thin coats rather than one heavy one, and let each dry fully. Keep the final layer thin so the pigment sits evenly over the gloss black base. A wet palette helps you keep the paint workable while you build those layers.
What is the difference between chameleon paint and metallic paint?
Metallic paint reflects light in one consistent tone, so a silver sword reads silver from every angle. Chameleon paint contains pigments that refract light differently depending on the angle of incidence, so the same surface can read green, then purple, then gold as you turn it. That angle-dependent shift is the whole point of the finish. It also means the effect only shows up under decent lighting, so a dim shelf hides what the paint can do.
How do you seal chameleon paint on a miniature?
Use a clear coat that matches your intended finish, and test it on a spare piece first. Gloss varnish preserves the shift best because it keeps the surface reflective; matt varnish softens the effect noticeably. Apply thin coats rather than one heavy pass, and let each layer cure fully before handling. If you want a matt look without killing the shift, use gloss first and then a light matt coat, keeping the matt layer as thin as you can manage.
Getting a clean color shift comes down to three things: a glossy black base, thin layers, and patience between coats. Pewgilist helps makers get there with a curated lineup of chameleon paints, primers, and wet palettes built for this kind of work, plus how-to guides written by people who actually paint. Shop now and give your next build the finish it deserves.