
How to Fix Chalky Acrylic Paint: A Step-by-Step Guide
Table of Contents
- What Chalky Acrylic Paint Looks and Feels Like
- Why Acrylic Paint Looks Chalky After Drying
- Diagnosing Chalky Paint vs. Other Finish Problems
- Step-by-Step Repair Process for Chalky Paint
- How to Thin Acrylic Paint for Miniatures and Prevent Chalking
- How to Prevent Chalky Acrylic Paint
- Best Varnish for Miniature Painting and Final Protection
- Frequently Asked Questions
Last Updated: October 18, 2026
What Chalky Acrylic Paint Looks and Feels Like
Chalky acrylic paint has a dull, matte finish that lacks the smooth, vibrant look of properly applied paint, and knowing how to fix chalky acrylic paint is essential for restoring your work.
The residue comes off easily on your fingertip as white or colored dust, and the paint may flake or peel in small patches.
Up close the texture is grainy and light reflects unevenly, a sign that something went wrong during application, drying, or formulation.
Why Acrylic Paint Looks Chalky After Drying
Chalky acrylic paint usually comes from one of several causes.
Another frequent cause is layers that are too thin.
Poor surface preparation also leads to chalky finishes. On a surface that's too smooth or unprimed, paint sits on top instead of bonding.
Environment matters too. Extremely dry conditions or direct sunlight dry paint too fast, while high humidity can trap moisture and prevent proper film formation.
Low-quality or expired acrylic also produces chalky results.
Diagnosing Chalky Paint vs. Other Finish Problems
Before you scrub, sand, or repaint, confirm you're actually dealing with chalking. Acrylic finishes fail in several visually similar ways, and each has a different repair, treating binder starvation as surface chalking is how a small problem becomes a stripped miniature.
The four-question chalkiness test
Work through these in order on an inconspicuous area.
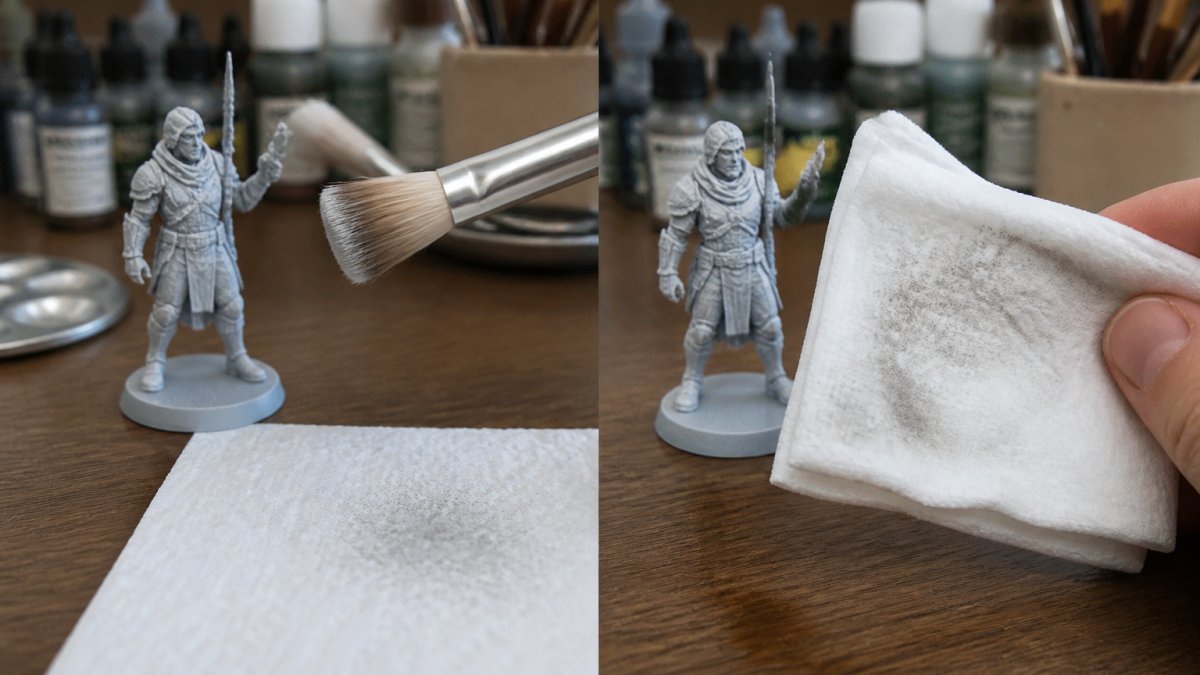
- Does dust transfer? Rub firmly with a dry white cloth or a clean finger. A white or tinted powder that comes off means loose pigment sitting on the surface, the classic chalking signature. No transfer points toward a different defect.
- Is the powder uniform or patchy? Uniform dust across the whole painted area suggests a formulation or thinning problem in the paint itself. Patchy dust concentrated on raised details, edges, or high spots points to abrasion or over-dry brushing.
- Does the surface feel gritty or slick? Gritty means pigment particles have separated from the binder and sit proud of the film. Slick but dull means the film formed correctly but the binder has degraded at the surface, often from UV exposure, heat, or an incompatible topcoat.
- Does the color wipe away or stay? If the color lifts onto the cloth, the pigment is unbonded. If only a white haze lifts and the color stays, you are likely seeing surfactant migration or amine blush, not chalking.
Chalking vs. the look-alikes
True chalking. Powdery, uniform, dust transfers, color washed out but still present under the dust.
Faded or oxidized paint. Color is lighter than you remember but the surface is smooth, sealed, and doesn't dust.
Cracked or peeling paint. Visible splits or flakes with the base layer showing through, an adhesion failure, not chalking.
Uneven coverage. Thin spots where the base shows through, but painted areas feel smooth and sealed.
Step-by-Step Repair Process for Chalky Paint
To fix chalky acrylic paint, you need a systematic approach: clean the surface, prepare it properly, and repaint with correct technique. This works for miniatures, canvas artwork, and other acrylic-painted surfaces.
Step 1: Clean and Remove Chalk Residue
Start by removing the loose chalky material. Wet the surface gently and scrub in circular motions with a stiff-bristled brush or soft scouring pad and clear water.
For miniatures and detailed work, use a soft toothbrush or detail brush instead of a rough scouring pad to avoid damaging underlying paint or fine details.
Rinse thoroughly with clean water as you work, changing your cloth or brush often to avoid redepositing chalk.
Step 2: Rinse and Allow the Surface to Dry
After cleaning, rinse the entire surface with fresh, clear water multiple times so no soap residue or chalk particles remain. Pat dry with a clean cloth.
Let the surface dry completely before the next step, 30 minutes to an hour for small pieces, several hours or overnight for larger surfaces.
Don't rush this step, moisture trapped under new paint causes additional problems.
Step 3: Sand or Scrub Loose Paint
Once dry, inspect for remaining loose paint and gently sand with fine-grit sandpaper (220-grit or higher) to create surface tooth that helps new paint adhere.
Sand lightly in circular motions, you're not removing all the old paint, just roughening the surface for grip.
For miniatures, use very light pressure and fine sandpaper to avoid damaging details; some painters prefer a soft scouring pad.
Step 4: Prepare the Surface and Apply Primer
Apply a high-quality primer to the prepared surface. Primer creates a better foundation for new paint and helps prevent chalking from recurring.
Let primer dry completely per the product instructions, most dry in 30 minutes to an hour.
For miniatures, use a primer designed for small-scale work. Spray primers suit larger surfaces; brush-on primers give more control on detailed pieces.
Step 5: Repaint and Seal with a Topcoat
Now repaint using proper technique. Thin acrylic paint for your project type, milk-like consistency for miniatures, slightly thicker for larger surfaces.
Apply thin, even coats and let each dry completely before adding another. Two to three thin coats beat one thick coat.
Once the paint is dry, apply a topcoat or varnish to seal and protect the work, preventing future chalking and guarding against wear and fading.
How to Thin Acrylic Paint for Miniatures and Prevent Chalking
Thinning is the most common place acrylic paint goes chalky on miniatures, and most advice stops at "thin it like milk." That's a starting point, not a specification, the real variables are the water-to-medium ratio, surface absorbency, and how much binder you leave behind each pass.
Why over-thinning causes chalking
Acrylic paint is pigment particles suspended in a binder (usually an acrylic polymer emulsion) that forms the film locking pigment to the surface. Adding water dilutes the binder along with the pigment; past a point there isn't enough binder to coat every particle, so they dry as loose powder, chalky paint.
That's why the fix for chalky miniatures is almost never "add more water", it's to restore binder, either by recoating with properly thinned paint or glazing a thin layer of medium over the affected area.
The ratio that actually matters: water to medium, not water to paint
A more useful rule than "milk-like" is to thin with a mix of water and acrylic medium rather than water alone.
For miniatures specifically, a practical starting point is:
- Base coats: paint thinned to roughly the consistency of skim milk, using a water-plus-medium mix. Aim for two to three thin coats rather than one opaque coat.
- Layers and glazes: thinner, with a higher proportion of medium to water, so the film still binds even at low opacity.
- Washes: mostly water and flow improver, with a small amount of medium. Washes are the most forgiving because they are meant to be thin, but they will chalk if the surface underneath is absorbent and pulls the binder away.
If you thin with water only, keep the ratio conservative, a few drops at a time, mixed thoroughly, and stop before the paint loses its body. If you can see individual pigment particles separating on the palette, you've gone too far.
Surface absorbency changes the math
A primed miniature, a gessoed canvas, and a bare resin base don't pull water out of paint at the same rate. Absorbent surfaces wick water out before the film can level, concentrating binder at the surface and leaving pigment chalky even at a ratio that worked on a sealed surface. If your surface drinks water, seal or prime it first, or thin with more medium and less water.
Flow improvers and retarders
Flow improvers reduce surface tension so thinned paint levels instead of beading. They aren't a substitute for binder, but they let you use less water for the same flow, indirectly reducing chalking risk. Retarders slow drying so the film can level and form, useful in dry rooms or under a fan. Use both sparingly; a drop or two per palette well is usually enough.
Environmental controls
- Humidity: very low humidity pulls water out of the film too fast and is a common cause of chalky miniatures. Aim for 40 to 60 percent relative humidity; a small hygrometer removes the guesswork.
- Temperature: moderate room temperature beats a cold garage or hot windowsill. Cold slows film formation; direct sun and heat dry the surface before the film coalesces.
- Airflow: good ventilation is fine, but a fan blowing directly on the piece accelerates drying and is a frequent culprit. Move the fan, do not turn it off entirely.
A quick thinning checklist
- Stir the paint in the bottle before dispensing, pigment settles.
- Put a small amount on the palette and add thinned medium a drop at a time.
- Mix until uniform, smooth and slightly translucent, not watery.
- Test on a primed offcut or the underside of the base before committing to the model.
- Apply thin coats and let each dry fully before the next.
- If a coat dries chalky, don't add more water, glaze a thin layer of medium over it to re-bind, then continue with a more medium-heavy mix.
How to Prevent Chalky Acrylic Paint
Prevention is easier than fixing chalky paint after the fact. Start with quality materials: professional-grade acrylics from trusted brands have better pigment concentrations and binders than budget options.
Store paints properly: keep acrylics in a cool, dry place with lids sealed tightly.
Prepare your surface correctly every time.
Control your environment. Paint indoors at room temperature when possible, and avoid direct sunlight or extremely dry conditions.
Use the right water for thinning. Distilled is ideal; tap water contains minerals that can affect performance.
Apply paint correctly: thin, even coats with complete drying between them.
Seal your finished work.
Best Varnish for Miniature Painting and Final Protection
Gloss varnish creates a shiny, reflective finish for certain styles, though it shows dust and fingerprints more easily.
Satin varnish splits the difference, offering a subtle sheen that's not quite matte and not fully glossy.
Apply varnish in thin coats with a soft brush or spray.
Chalky acrylic paint doesn't have to ruin your project.
At Pewgilist, we help makers and miniature painters succeed with quality materials and practical guidance.
Frequently Asked Questions
Why does acrylic paint look chalky after it dries?
Chalky acrylic paint results from several causes: improper thinning (too much water), low paint adhesion to the surface, rapid drying conditions, or using low-quality paint that lacks binders. When acrylic paint dries too quickly or lacks proper adhesion, pigment particles sit loosely on the surface rather than bonding into a cohesive paint layer, creating that dusty, chalky finish. Humidity and temperature during application also affect how the paint layer cures.
Can I paint over chalky acrylic paint without fixing it first?
Painting directly over chalky paint is not recommended. The chalk residue prevents new paint from adhering properly, leading to similar chalky results. Always clean away the chalk residue with a damp cloth and stiff-bristled brush, allow the surface to dry completely, and lightly sand the area to improve surface tooth. Once prepared, apply a high-quality primer before repainting to ensure proper adhesion and a smooth finish.
What's the best way to thin acrylic paint for miniatures to avoid chalking?
Use a ratio of 2-3 parts paint to 1 part water or acrylic medium when thinning for miniatures. Acrylic medium is preferable to water alone because it maintains paint adhesion while reducing thickness. Mix thoroughly and test the consistency on a scrap surface first. Avoid over-thinning, which reduces binders and causes chalky finishes. For miniature painting, multiple thin layers adhere better than one thick layer, preventing the chalky appearance common in single-coat applications.
Should I varnish miniatures with chalky paint, or should I fix it first?
Fix the chalky paint before varnishing. A varnish topcoat applied over chalky paint will not adhere properly and may flake or look uneven. Clean the chalk residue, sand the surface lightly, and repaint with properly thinned acrylic paint. Once the paint layer is smooth and adheres well, apply a high-quality varnish for final protection. This ensures both the paint and varnish finish look professional and last longer.